Friday 27 September 2013

Cauliflower Pizza Crust a.k.a the pizza that was not to be

Hiiiii. I've seen variations of this pizza crust floating around the blogosphere. I wasn't interested in trying it cos I figured I could get the real thing anytime I wanted. I also didn't trust it to taste good, so I kept skipping it. Since I started this WOE, I've been craving pizza so I decided to try this and just get it out of the way.

Truth be told, even though I tweaked the recipe, I was a little (actually a LOT) wary of this crust when I was making it. I just figured that I would use all the cheese and topping to mask the taste if it turned out awful.

Boy, was I wrong! As you can see from the pictures below, I set outa bunch of things to top my pizza crust with, but I never got to use them. As soon as the crust came out of the oven, DH and I decided to steal pinches from the crust to see if it was any good.

To cut a long story short, we ate the whole crust straight from the oven, while standing in the kitchen. It was THAT good. Yummmmmmmmmm! I actually don't think I'm going to ever bother topping this crust, I'll just keep eating only the crust.

Cauliflower is a cruciferous vegetable; broccoli, cabbage, Brussels sprouts are also included in that family. Consumption of these vegetables is linked to low rates of prostate cancer. Cauliflower is a good source of Omega-3, folate, Vitamins C, B-6 and B-12. How can you say no to that?

Preggies are not left out (congratulations!) as cauliflower is rich in fibre. I know how essential fibre is in a pregnant woman's diet...constipation, anyone?

Please make this, and enjoy it.
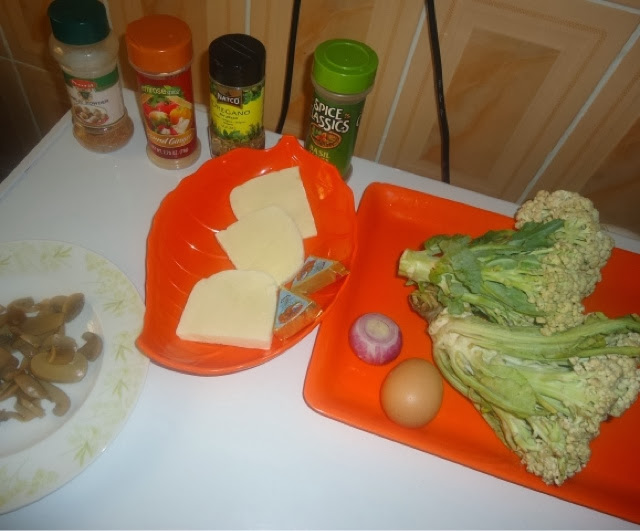
Ingredients

500g of cauliflower
1 egg
1 teaspoon of oregano
1/2 teaspoon of garlic powder
1/2 teaspoon of ginger powder
2 wedges of light cheese (room temperature)
1/2 teaspoon of salt

Method

Preheat oven to 350.
Cut out the cauliflower florets and wash thoroughly. Grate or process the cauliflower till it resembles breadcrumbs.

Put the cauliflower in a pot, and set it over medium heat. Leave it for 4 minutes, the cauliflower will release some liquid.

Transfer the cauliflower to a tea towel, and, as soon as it's cool enough to handle, squeeze the life out of it ( just as hard as you can to remove all the liquid you can).

Put the cauliflower in a large bowl and add the remaining ingredients. Mix to combine. Grease a sheet of wax paper and put the cauliflower on it. Use your hands to press the cauliflower into the shape of a pizza crust (not too thick or too thin) then bake for 10-12 minutes.

If you can make it past this stage, add your choice of toppings and bake for an additional 7 minutes.

Enjoy, and remember,
It's sooo good for you.

Deema


Bulgur and Spinach Pottage

I've already written about the nutritional value of Bulgur and why it's a good addition to a fertility diet. Please read about it here.

Spinach is virtually a super food, remember Popeye? Consumption of spinach in moderation is a must for a fertility diet. Spinach is full of folate, zinc, iron and antioxidants. I'm sure y'all know what that means. Not only is this recipe fertility-friendly, it's actually quite beneficial to pregnant and nursing women as well.

This recipe is yummy, the pairing of the spinach and the bulgur is a match made in heaven (Deema, u like food sha!). Please use boneless fish, that's very important. I used swak, but you can use anything you like.

Ingredients

1 cup of bulgur
400g of fresh spinach
1 1/2 cups of sliced button mushrooms
1 red onion, sliced
4 fish fillets, steamed
3 tablespoons of freshly blended atarodo (habanero)
1 Knorr double stock cube
2 cloves of garlic, diced
2 tablespoons of butter
1 teaspoon of salt

Method

Flake the steamed fish with a fork. In a pot on medium-high heat, add 3 cups of water. Add the butter and the stock cubes. Bring it to a boil, add the bulgur. Simmer for 3 minutes, then turn off the heat to allow the bulgur soak up the liquid.

In another pot, put the spinach. Set the pot over medium-low heat. Leave the spinach to cook down, then add the onions, mushrooms, salt, garlic, pepper and fish. Stir and simmer for 2 minutes. Add the bulgur and stir to combine. Leave to cook for 2 more minutes. Serve...

Remember,
It's sooo good for you!

Deema


Thursday 26 September 2013

Chickpea and Zucchini Muffins

I've already written about the benefit of chickpeas to fertility. Please read all about it here.

Today, I'm focusing on zucchini. Prior to this WOE (way of eating), I was a zucchini lover, but I'm pretty sure the way I was using it made it more harmful than helpful to me. I used zucchini ONLY in zucchini bread, which is quite lovely, but the quantity of sugar I used was out of this world. Now, it calls to mind times when my beloved Paula Deen would add parsley to one of her deep fried, butter glazed recipes,and call it healthy. Lol...p.s, I love Paula Deen!!!

Zucchini is a pretty good source of vitamin c, potassium, and fibre. These are pretty crucial to optimal fertility in both men and women. I don't want to make this a long post, I'm sure we all know how these are helpful to TTC.

This is a pretty easy recipe, I came up with it because I wanted something to snack on. It satisfied my craving, and it gets bonuses for being freezer friendly as well.

Ingredients

14oz can of chickpeas
200g of Zucchini
1 teaspoon of onion powder
1 teaspoon of white pepper
1 1/2 tablespoon of honey
2 eggs

Method

Preheat oven to 350
Rinse the chikpeas. Process or grate the zucchini. You can peel it, but I don't peel mine...added fibre or laziness? Lol!
Transfer the zucchini to a blender or switch your processor blade. Add the remaining ingredients and blend to a fine purée.
Pour the mixture into a greased muffin or cupcake pan. Bake for 20 minutes.

Enjoy, and remember,
It's sooo good for you!

Deema


Thursday 19 September 2013

Coconut Flour, the easier way

Hiiii. Okay, seeing as I'm going to be incorporating more coconut flour into my recipes, I figured I would show you a lazy way of making it. The more stressful way is to use fresh coconuts, which would involve breaking the coconuts and grating them. Well, sometimes, you just don't have the patience to grate!

Enter unsweetened desiccated coconuts. This way, you take a shortcut to both coconut milk and coconut flour.

Ingredients

500g of unsweetened desiccated coconut
Boiling water (the quantity of water depends on how light or thick your want your milk to be)

Method

In a large bowl, combine the coconuts and hot water. Stir well and cover. Leave it for 30 minutes. Pour into a sieve, making sure to squeeze out all the liquid from the chaff. If your milk is too thick, repeat with a little more hot water.
Spread the chaff evenly on a baking sheet. Put it in the oven at 300 for about 30 minutes. Check to make sure chaff is dry and crisp. Process into a powder. Use in recipes that call for it.

Enjoy, and remember,
It's sooo good for you!

Deema


Bean Pasta

I'm on a food high right now! I wish you could see me, I'm smiling from cheek to cheek. This is awesome!

I know I've lost you; let me fill you in. A friend of mine came visiting last week. She has been trying to conceive for 5 years now. That day, she told me she's also diabetic. Her greatest challenge is finding interesting food choices. She's one of those people who can't even eat wheat because it spikes her blood sugar. That reminds me, please, if you know anyone who's diabetic, they shouldn't just be eating wheat because it's healthier- they should check their sugar levels after wheat consumption, from what I hear, wheat isn't for all diabetics.

Anyway, back to my friend: I decided to look into healthier food options for her, keeping in mind that most diabetes friendly foods are fertility-friendly, especially for women with fibroids, PCOS, and endo. I got a list of foods she could eat, and started working on recreating them in interesting recipes. Well, this is the first of them, and I can tell you it rocked! I'm going to be trying out two other flour substitutes for pasta, and I will let you know how they go.

This is going to be a staple in my house, from now on. I'm drying some now to see how well they keep. I don't think I'm going to have regular pasta for a long time (it sounds extreme, I know, but I'm willing to do anything food-wise that will bring me a step closer to holding my babies in my arms) because these came out soooooo good. It's also DH approved! Lol.

Now the taste of this differs from regular pasta (duh!) but in a nice way. It absorbed the taste of the sauce excellently, and just had the slightest hint of beans.

Tips:

1. Roll out the dough as thinly as possible so the resultant pasta is light as well. Don't bother with a pasta roller, the dough is very easy to roll out.

2. Leave the dough to rest for 3-5 hours, I find it is easier to work with after it has rested well.

3. Don't leave this dough in the fridge overnight- I did, and I wasn't pleased with the colour the next day. If you don't have the time, wrap it in cling film or put it in a freezer bag and freeze.

4. This pasta doesn't like being turned too much, once you start cooking it, toss it once or twice with thongs or 2 forks-never with a spoon; it's prone to breakage.

I tossed mine in tomato sauce. You can serve it anyway you like. I also put oregano in my doughy, this is totally optional, but the options you can add in are endless. I'm thinking red pepper flakes or spinach. Yum! In fact, before the week runs out, I'm soooo making lasagna with this!


Ingredients

1 3/4 cups of beans flour (I took mine to the market to grind) I used brown beans
2 medium eggs
1 tablespoon of almond oil
1/2 teaspoon of sea salt
1 teaspoon of oregano (optional, use red pepper flakes, garlic powder, spinach, anything you like!)

Method

Sift the flour and salt together in a mixing bowl.
Add the eggs and oil. Use a fork to mix to form a dough. If your dough is too dry, add 1 teaspoon of water and mix. Cover the dough with a tea cloth and let it rest for at least 3 hours.
Dust your rolling surface with a little bean flour. Roll out the dough very thinly and cut into any shape you like. I made bow ties, you can make fettuccine by cutting straight strips.
Bring water to the boil in a large pot, add the pasta. Cook for 8 minutes, then drain. Serve anyway you like, and enjoy.

Aminata, this one is for you!

Remember,
It's sooo good for you,

Deema.


Monday 9 September 2013

Too Easy Tilapia (or any fish you like)

Heyyy! I'm happy to inform you that I'm noticing major changes in my general health.
For one, my skin is glowing! As in! My skin was nice before, don't get me wrong. Now, however, wow! More people are starting to ask me what cream I use. And they think I'm lying when I say it's not the cream (I use Vaseline, by the way), it's my WOE (way of eating). Lol!

The second thing I've noticed (and this is MAJOR for me, like a miracle) is I now sleep properly.
Ever since I can remember, I've had to read myself to sleep or watch cartoons to sleep. Now, for the past 5 days, I've slept without cartoons or books. Imagine the ordeal my poor Dh has had to put up with for almost 4 years now. In fact, I don't know who's happier now, him or me. For 5 days, I'm off to dreamland  as soon as my head touches my pillow (now if only the million-pound cheque I get in my dreams can just stay in my hand when I wake up...dream on, dreamer!).

Anyway, this is a really easy meal. And it's really filling. Everything on the plate is fertility-friendly, without me having to go into the nutrition of each ingredient. This is also safe for pregnant and lactating women.

Ingredients

8oz Tilapia, (mine is just half of a whole fish)
7 atarodo (habanero)
2 teaspoons of sea salt
3 carrots, cut into matchsticks
Handful of green beans, trimmed
Pinch of salt

Method

Blend the pepper with 3 cups of water. Pour into a large bowl. Add salt, mix. Put the fish in and leave to marinate for 1 hour.
Heat a non-stick pan over medium-high heat. Spray with cooking spray. Place the fish in the pan and cover. Cook for 5 minutes on one side.
When you turn over the fish, add the Veggies and sprinkle a pinch of salt over them. Cover and cook for 5 minutes.
Serve and enjoy

Remember, it's sooo good for you,


Deema

Coconut Jollof Rice and Cowtail Gravy.

I'm an unrepentant foodie to the core! If loving good food is a crime, please lock me up and throw away the keys (don't even bother with a trial). This recipe examplifies my love of food.

I just had to find a way to combine two wholesome, tasty meals into one healthy, delicious, fertility-friendly meal. If you aren't like me, you can serve your cowtails with white rice, couscous, bulgur, pretty much anything you like. Or you can serve the rice with fish or chicken.

Now, to the nutrition...did you know that bone broth is a 'treatment' for infertility? Well, neither did I, until I started eating this way. Apparently, when bones are cooked down, all the nutrients from the bone marrow-calcium, magnesium, potassium, etc- seep into the broth, making it one of the most nutrient-dense foods you can consume.

Bone broth, while being good for all men and women who are trying to conceive, is particularly helpful for women who have PCOS, as the nutrients in the bone marrow promote thyroid health.

If I still haven't piqued your interest with all the above, I'm sure I will now- the gelatin in bone broth is proven to reduce the appearance of wrinkles and cellulite. AHA! I've got you now! I can see you rushing to your freezer to bring out ALL the bones you have...cool down!

I chose cowtails because they contain more gelatin and juicy marrow than most bony cuts of meat.

Extra: in your quest for bone broth, pepper soup is fine! You can use chicken bones, cow, goat, anything!

Nutrition aside, this meal is hecka tasty...you're making it, period!


Ingredients for Cowtail Gravy

1.5 kg of cowtail, cut into 2-inch chunks.
2 juicy tomatoes, diced
1/4 teaspoon of freshly ground black pepper
2 tablespoons of freshly ground atarodo (habanero)
2 tablespoons of freshly ground onions
1 teaspoon of mustard seeds, ground
2 bay leaves
1 teaspoon of dried basil
1 14oz can of chickpeas, rinsed (totally optional!)
1/2 teaspoon of worcestershire sauce (optional)
2 teaspoons of salt
2 teaspoons of garlic powder
2 large carrots, peeled and diced
3 tablespoons of cornflour, mixed with 2 tablespoons of water to make a slurry


Coconut Jollof Rice

3 cups of rice, washed and parboiled
3 tablespoons of coconut oil
3 tablespoons of freshly ground atarodo(habanero) and onions
4 medium tomatoes, chopped
5 cups of coconut milk
2 Knorr double stock cubes
1 teaspoons of salt
1 bay leaf


Method-Cowtail Gravy

Place the cowtails in a pressure cooker on medium-high heat. Add all ingredients except chickpeas and carrots. Add enough water to just cover the cowtails. Cover and cook for 45 minutes.

Open the pot after letting the pressure come down (don't cover the pot again!). Reduce heat to medium-low, add the carrots. Cook for 3 minutes. Add the chickpeas and the cornstarch slurry. Simmer for 3 minutes. Remove from heat.


Coconut Jollof Rice

To a pot on medium-high heat, add the oil. After 30 seconds, add the tomatoes, pepper paste and bay leaf. Stir and cook for 5 minutes.
Pour the coconut milk in. Add salt and stock cubes. Stir and bring to boil.
Pour in the parboiled rice. Cook till all the water is gone. Fluff with a fork and remove from heat. Serve with cowtail gravy and YUM!

Enjoy, and remember,
it's sooo good for you!

Deema